Using Butt Encoder: A Comprehensive Guide to Connecting and Enhancing Your Live Streaming Experience
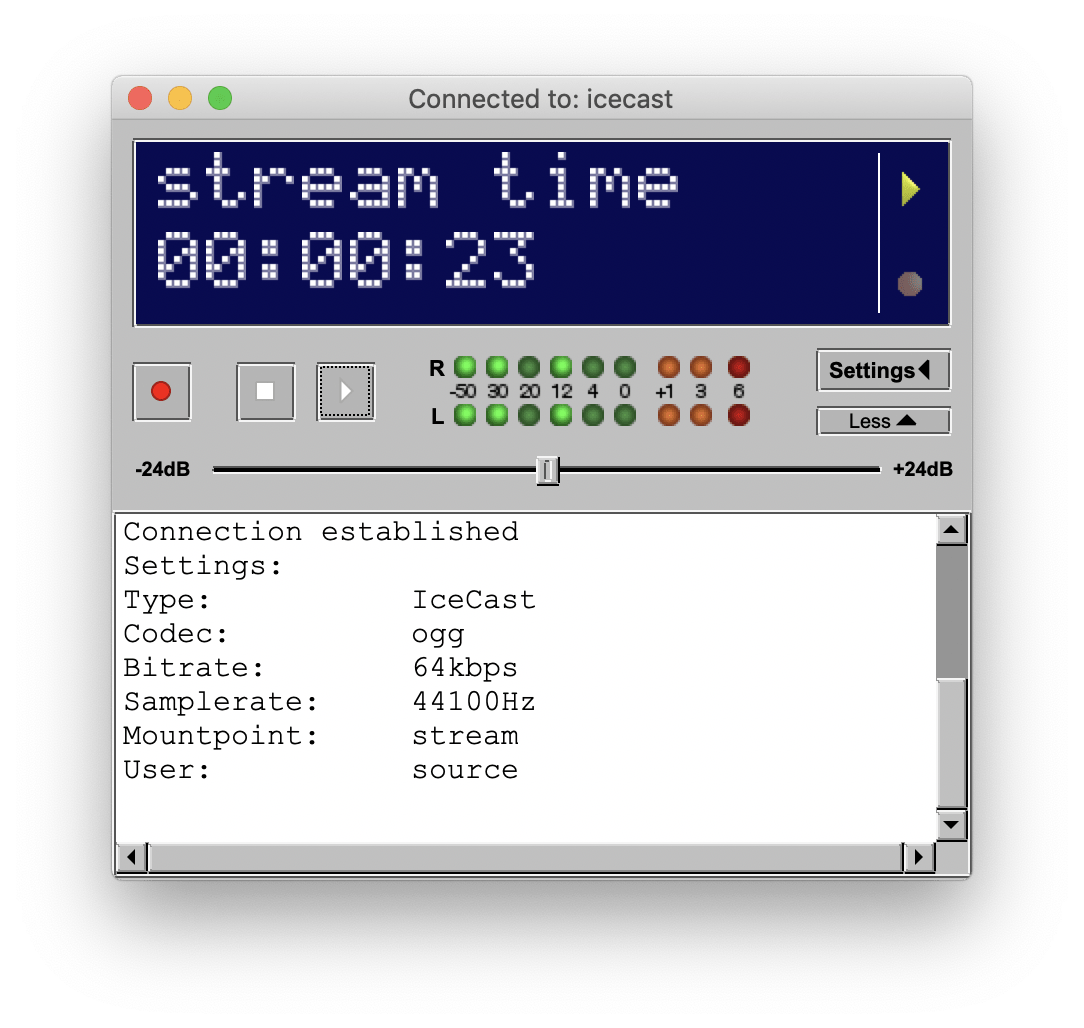
Table of Contents
Streaming live audio over the internet has become an increasingly popular way for content creators to share their music, podcasts, or radio broadcasts with a global audience. If you’re looking for a reliable and easy-to-use tool to help you do this, using Butt (Broadcasting Using This Tool) is an excellent choice.
It’s a free, open-source program that has been developed specifically for live audio streaming. It’s compatible with multiple operating systems, including Windows, macOS, and Linux, and it can be used to stream audio to an Icecast or Shoutcast server.
One of the great advantages of Butt Encoder is that it’s straightforward to set up and use, even if you’re not an experienced audio engineer. The software has a simple and intuitive interface that allows you to configure your audio settings and connect to a server with just a few clicks.
Additionally, the Butt streaming software provides a range of features that can help you customize your streaming experience. For example, you can add effects and filters to your audio to improve its quality, or you can record your stream for later editing or use as a podcast.
Using it to stream live audio is a great way to engage with your audience and share your content with the world. Whether you’re a musician looking to perform live, a podcaster wanting to connect with listeners, or a radio broadcaster aiming to reach a wider audience, Butt Encoder can help you achieve your goals.
In the following sections, we’ll provide a step-by-step guide on how to download, install, and connect to a server using Butt Encoder. By the end of this post, you’ll have all the information you need to start streaming your live audio content with confidence.
Step 1: Download and Install Butt Streaming Software
The first step is to download and install Butt Encoder on your computer. The Butt streaming software is available for Windows, macOS, and Linux operating systems. You can download the software from the official website at https://sourceforge.net/projects/butt/. Once you have downloaded the installer, follow the on-screen instructions to install the program.

Step 2: Configure Your Audio Settings
Before you start streaming, you need to configure your audio settings within the Butt streaming software. To do this, open Butt Encoder and click on the “Settings” button. In the settings window, select the audio device that you want to use for streaming. You can also adjust the audio bitrate, sample rate, and other settings to optimize the audio quality.
Step 3: Connect to Your Server Using Butt Encoder
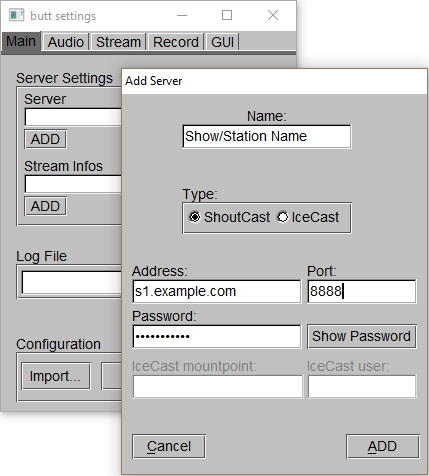
Once you have configured your audio settings, you need to connect to your Icecast or Shoutcast server. To do this, click on the “Server” button in Butt Encoder. In the server window, enter the URL (nap.casthost.net OR cad.casthost.net) or IP address of your server, along with the port number and password if required. Click on the “Connect” button to connect to your server. If you do not have a server yet, see our Icecast and Shoutcast hosting plans.
Step 4: Start Streaming
With your server connection established, you can now start streaming live audio. In Butt Encoder, click on the “Play” button to start streaming. You should see the audio levels in the VU meters, indicating that audio is being streamed to the server.
Step 5: Monitor Your Stream
While streaming, it’s important to monitor your stream to ensure that the audio quality is good and that there are no issues. In Butt Encoder, you can monitor your stream by looking at the VU meters and by listening to the audio feed through your server’s website or other streaming software.
In conclusion, Butt Encoder is a simple and reliable tool for streaming live audio over the internet. By following the steps outlined in this blog post, you should be able to connect and stream live using Butt Encoder with ease. Remember to test your stream before going live to ensure that everything is working as expected. Good luck!
Ready to create your account and and join our community? Click here to check out stream packages. For more tips and tricks to elevate your streaming experience, don’t forget to explore our blog here – your go-to resource for all the latest insights and strategies in the world of live streaming!
Related Articles
FAQ: Using Butt Encoder for Live Streaming
What are the system requirements for installing Butt Encoder on my computer?
The Butt streaming software is compatible with multiple operating systems, including Windows, macOS, and Linux. To ensure smooth operation, your system should have at least 512 MB of RAM and a stable internet connection for uninterrupted streaming. Make sure your audio hardware is compatible with your computer’s operating system and properly configured to work with Butt Encoder.
Can I record my live streams using Butt Encoder and if so, how?
Yes, it offers a recording feature that allows you to record your live streams. To enable recording, open the Butt Encoder application, go to the “Settings” menu, and select the ‘Stream’ tab. Check the option that says “Record Stream” and choose the file path where you want your recordings to be saved. This feature is particularly useful for podcasters or broadcasters who want to archive their live sessions for later use or distribution.
How do I ensure the best audio quality when streaming with Butt Encoder?
To achieve the best audio quality, configure your audio settings appropriately within Butt Encoder before you start streaming. Open the application and click on “Settings” to adjust your audio device and configure the bitrate, sample rate, and other relevant settings. Opt for a higher bitrate for better audio quality, but be mindful of your and your listeners’ internet bandwidth capabilities. Also, consider using professional-grade microphones and sound-proofing your recording environment to minimize background noise and echo.
 Home
Home